三��、Common Defects and Cause Analysis of Poor Shearing
1. Glitch
1.1 Reasons
The root cause of the burr is the flatness of the blade itself, the relative parallelism of the upper and lower blades, and the deviation of the blade plane and the parallelism of the edge of the strip after shearing, resulting in secondary shearing between the upper blade and the edge of the strip; common reasons The edge that bears the shearing surface of the blade is chipped, burned or bonded, there is foreign matter on the side of the blade when the blade is installed, or the blade is not demagnetized after grinding, resulting in iron filings on the cutting edge.
1.2 Countermeasures
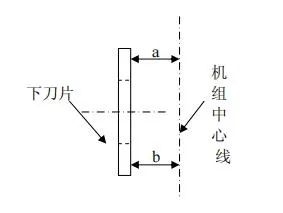
Adjust according to the correct adjustment process when cutting strips of various specifications; in order to reduce the influence of the flatness of the blade itself and the relative parallelism deviation of the upper and lower blades, the gap between the blades can be appropriately enlarged during adjustment, so that the shearing The cross section of the rear steel belt is an inverted trapezoid to reduce the secondary shearing area; during installation, ensure the parallelism of the blade plane and the center line of the unit, and at the same time make the blade outlet side spacing slightly larger than the inlet side spacing (0 ~ 1mm); Work after replacing the blade in time; ensure the accuracy of the new blade and the blade after grinding, and demagnetize the blade after grinding.
2. Cut continuously
2.1 Reasons
The root cause of continuous shearing is that the gap between the blades is too large or the overlap is too small; the common reasons are that the blade is chipped, the blade is too blunt, and the inner hole of the blade is too large, resulting in large fluctuations in the amount of overlap during shearing, and the pressure on the disc. The matching of diameter to blade diameter is unreasonable.
2.2 Countermeasures
Adjust the strip steel of each specification according to the correct adjustment process during operation; check the condition of the blade, and change the blade in time; under normal circumstances, the diameter of the pressing disc should be 4mm smaller than the diameter of the blade to ensure that the edge wire has enough space for breakage. When installing the knife, select the correct pressing plate according to the actual size of the blade; ensure the machining accuracy of the blade; when installing the knife, be sure to clean the end face of the knife sleeve, the end face of the blade, and the end face of the pressing plate, and it is strictly forbidden to have any attachments.
3. The tear surface is not smooth
3.1 Reasons
The main reason for the unsmooth tearing surface is that the relative parallelism deviation of the upper and lower blade planes is too large; the relative parallelism deviation between the blade plane and the center line of the unit is too large (the lower blade has an obvious influence); the amount of blade clearance is too large (thick plate appears higher chance); the edge of the blade that bears the cutting surface is chipped, burned, or bonded.
3.2 Countermeasures
Try to ensure the relative parallelism of the upper and lower knife planes; ensure the relative parallelism of the knife plane and the centerline of the unit during installation, and the distance (a) between the blade outlet side and the unit centerline should be equal to or slightly greater than the distance between the inlet side and the unit centerline ( b); Install the knife according to the correct operation method, and work after replacing the blade in time. The relative parallelism of the upper and lower blades depends on the manufacture, processing performance and assembly accuracy of the disc shear itself, as well as the processing performance of the blade.
四��、Adjustment Mechanism and Correct Adjustment Method of Disc Shear
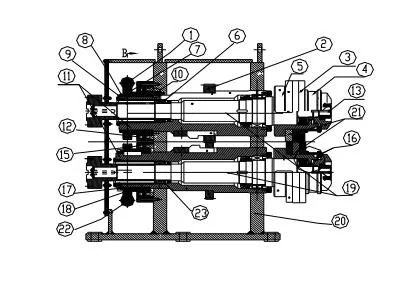
1. Structure of disc scissors
2. Disc scissors by rack
19. The spindle 20, the blade 21, the knife cover 5, the adjustment mechanism and the transmission mechanism. The adjustment of the blade backlash is realized by the rotation of the worm 1 and the worm wheel 7. The adjustment of the overlap amount is realized by the synchronous rotation of the eccentric sleeve 11 driven by the rotation of the worm 22 and the worm wheel 18 .
3. The gap between the blades fluctuates
2.1 Reasons
The fluctuation of the gap between the blades is due to the axial movement of the eccentric sleeve and the mandrel; the machining accuracy of the knife sleeve 5 and the mandrel 19 and the accuracy of their cooperation are not high; the pressing force of the blade locking mechanism is not enough and the bearing is damaged. ; The machining accuracy of the blade is not high and the assembly is not in place.
2.2 Countermeasures
The movement of the upper knife shaft should be checked from the following aspects: a Whether the axial clearance of the eccentric sleeve thrust bearing 12 is too large (≤0.005mm), and whether the bearing is damaged; b Whether the fixation of the spindle thrust bearing 6 is firm, c thread Whether there is a gap between the sleeve 8 and the eccentric pin 9. The movement of the lower tool shaft should be checked from the following aspects: a whether the axial clearance of the eccentric sleeve thrust bearing 15 is too large (≤0.005mm) and whether the bearing is damaged; b whether the fixing of the spindle thrust bearing 23 is firm, c and Cap 17 is securely in place. Ensure the machining accuracy of the tool sleeve, mandrel and blade; install the tool according to the correct method, and it is strictly forbidden to have foreign objects on the end face of the blade when installing the tool.
3. The amount of blade overlap fluctuates
3.1 Reasons
The cylindricity of the blade is not high, the inner hole of the blade is too large, and the gap between the blade sleeve and the mandrel is too large.
3.2 Countermeasures
To ensure the machining quality of the blade, thin copper spacers can be used for blades with too large inner holes.
4. Adjustment of the blade
In order to eliminate the gap between the adjusting nut 8 and the eccentric pin 9, the adjustment of the backlash (upper shaft) should be adjusted in descending order. In order to eliminate the interference clearance of the lower eccentric sleeve thrust 15, the adjustment of the overlap amount on the operation side should be adjusted from small to large, and the transmission side should be adjusted in the order from large to small. Adjust according to the principle of adjusting the overlap first and then adjusting the gap. After the adjustment, idle the scissors for a period of time, and then use the same specifications of the material head for trial cutting. After the trial cutting, observe the quality of the cutting edge, and check the blade gap. If the gap fluctuates, re-adjust according to the above steps.
5. Assembly of the cutting blade
Before installing the scissors, thoroughly clean the knife cover, the blade and the pressing plate, and it is strictly forbidden to stick foreign objects on them. During the assembly process, rotate the blade and push it inward, or use two red copper rods to tap lightly at the same time. It is strictly forbidden to use metal objects such as hammers, and it is not allowed to force the blade in. After it is in place, check whether the blade is tightly attached. on the end face of the tool shaft. The diameter difference between the upper and lower blades should be controlled within 2mm, and the diameters of the coaxial blades should be the same.
五����、Grinding and management of blades
1. Grinding of the blade
When the cutting edge of the blade is defective, the blade should be ground. There are two methods of grinding the blade: plane grinding and outer edge grinding, which can also be used at the same time. Usually, outer edge grinding is used, and when the number of outer edge grinding reaches more than three times, the plane is ground once to eliminate the fatigue layer of the end face. The insert shall guarantee the following tolerances:
|
Project |
Allowable tolerance range |
|
Outer diameter (mm) |
0~-0.025 |
|
Inner diameter (mm) |
+0.05~0.075 |
|
Flatness (mm) |
0.02 |
|
Parallelism // (mm) |
0.01 |
|
Cylindricity/○/ |
0.018 |
|
Roundness○ |
0.018 |
|
Section beating→ |
0.01 |
|
Surface roughness (microns) |
0.80 |


